Showing posts with label Visual Basic. Show all posts

Friday, 4 January 2013

VB.NET Crystal Reports for Beginners

Start your first VB.NET Crystal Reports .

All Crystal Reports programming samples in this tutorials is based on the following database (crystaldb) . Please take a look at the database structure before you start this tutorial - Click here to see Database Structure .

Open Visual Studio .NET and select a new Visual Basic .NET Project.

Create a new Crystal Reports for Product table from the above database crystalDB. The Product Table has three fields (Product_id,Product_name,Product_price) and we are showing the whole table data in the Crystal Reports.

From main menu in Visual Studio select PROJECT-->Add New Item . Then Add New Item dialogue will appear and select Crystal Reports from the dialogue box
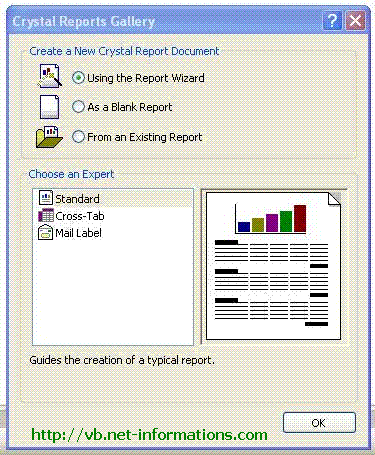
Select Report type from Crystal Reports gallery.
Accept the default settings and click OK.

Next step is to select the appropriate connection to your database. Here we are going to select OLEDB connection for SQL Server

Select OLE DB (ADO) from Create New Connection .
Select Microsoft OLE DB Provider for SQL Server .
Next screen is the SQL Server authentication screen . Select your Sql Server name , enter userid , password and select your Database Name . Click next , Then the screen shows OLE DB Property values , leave it as it is , and click finish.

Then you will get your Server name under OLEDB Connection from there select database name (Crystaldb) and click the tables , then you can see all your tables from your database.

From the tables list select Product table to the right side list .
Click Next Button

Select all fields from Product table to the right side list .
Click Finish Button. Then you can see the Crystal Reports designer window . You can arrange the design according your requirements. Your screen look like the following picture.
Now the designing part is over and the next step is to call the created Crystal Reports in VB.NET through Crystal Reports Viewer control .

Select the default form (Form1.vb) you created in VB.NET and drag a button and CrystalReportViewer control to your form.
Select Form's source code view and put the code on top

Imports CrystalDecisions.CrystalReports.Engine

Put the following source code in the button click event


Imports CrystalDecisions.CrystalReports.Engine
Public Class Form1
    Private Sub Button1_Click(ByVal sender As System.Object, 
	ByVal e As System.EventArgs) Handles Button1.Click
        Dim cryRpt As New ReportDocument
        cryRpt.Load("PUT CRYSTAL REPORT PATH HERE\CrystalReport1.rpt")
        CrystalReportViewer1.ReportSource = cryRpt
        CrystalReportViewer1.Refresh()
    End Sub
End Class
NOTES: cryRpt.Load("PUT CRYSTAL REPORT PATH HERE\CrystalReport1.rpt") The Crystal Reports is in your project location, there you can see CrystalReport1.rpt . So give the full path name of report here. After you run the source code you will get the report like this.
Hope this tutorial help you to create your first Crystal Reports

Open and Edit Cells in an Excel file in VB.NET


The following sections you can find how to open and edit an Excel worksheet through VB.NET . For open or edit an Excel worksheet in VB.NET , you have to add the Microsoft Excel 12.0 Object Library in you project.

From the following pictures to show how to add Excel reference library in your project.

Step1:
Create a new project and add a button to the Form.
Select reference dialouge from Project menu


Step2:
Select Microsoft Excel 12.0 Object Library and click OK button
Step3:
Now you can start coding to open or read from Excel file and edit cells.
Step4:
copy and paste the below code


Imports Excel = Microsoft.Office.Interop.Excel
Public Class Form1
    Private Sub Button1_Click(ByVal sender As System.Object, _
 ByVal e As System.EventArgs) Handles Button1.Click

        Dim xlApp As Excel.Application
        Dim xlWorkBook As Excel.Workbook
        Dim xlWorkSheet As Excel.Worksheet

        xlApp = New Excel.ApplicationClass
        xlWorkBook = xlApp.Workbooks.Open("c:\test1.xlsx")
        xlWorkSheet = xlWorkBook.Worksheets("sheet1")
        'display the cells value B2
        MsgBox(xlWorkSheet.Cells(2, 2).value)
        'edit the cell with new value
        xlWorkSheet.Cells(2, 2) = "http://vb.net-informations.com"
        xlWorkBook.Close()
        xlApp.Quit()

        releaseObject(xlApp)
        releaseObject(xlWorkBook)
        releaseObject(xlWorkSheet)

    End Sub

    Private Sub releaseObject(ByVal obj As Object)
        Try
            System.Runtime.InteropServices.Marshal.ReleaseComObject(obj)
            obj = Nothing
        Catch ex As Exception
            obj = Nothing
        Finally
            GC.Collect()
        End Try
    End Sub

End Class

Create an Excel file in VB.NET


From the following sections you can find how to create an Excel worksheet through VB.NET . For creating an Excel worksheet in VB.NET , you have to add the Microsoft Excel 12.0 Object Library in you project.

From the following pictures to show how to add Excel reference library in your project.


Step1:
     Create a new project and add a button to the Form.
     Select reference dialouge from Project menu


 Step2:
    Select Microsoft Excel 12.0 Object Library and click OK button
Step3:
    Now you can start coding to create a new Excel file.
For example like this code 


Imports Excel = Microsoft.Office.Interop.Excel
Public Class Form1
    Private Sub Button1_Click(ByVal sender As System.Object,_
  ByVal e As System.EventArgs) Handles Button1.Click

        Dim xlApp As Excel.Application
        Dim xlWorkBook As Excel.Workbook
        Dim xlWorkSheet As Excel.Worksheet
        Dim misValue As Object = System.Reflection.Missing.Value

        xlApp = New Excel.ApplicationClass
        xlWorkBook = xlApp.Workbooks.Add(misValue)
        xlWorkSheet = xlWorkBook.Sheets("sheet1")
        xlWorkSheet.Cells(1, 1) = "http://vb.net-informations.com"
        xlWorkSheet.SaveAs("C:\vbexcel.xlsx")

        xlWorkBook.Close()
        xlApp.Quit()

        releaseObject(xlApp)
        releaseObject(xlWorkBook)
        releaseObject(xlWorkSheet)

        MsgBox("Excel file created , you can find the file c:\")
    End Sub

    Private Sub releaseObject(ByVal obj As Object)
        Try
            System.Runtime.InteropServices.Marshal.ReleaseComObject(obj)
            obj = Nothing
        Catch ex As Exception
            obj = Nothing
        Finally
            GC.Collect()
        End Try
    End Sub

End Class
output of the program: In the code , Imports Excel = Microsoft.Office.Interop.Excel - we assign the excel reference to a vatriable Excel. When you execute this program , the file created in the c:\ of your computer .

Sunday, 23 September 2012

Array list in vb.net


Arraylist is one of the most flexible data structure from list, Array List contains a simple list of values and very easily we can add, insert, delete, and view etc. to do with ArrayList. It is very flexible because we can add without any size information, which is it grow dynamically and also shrink.
Important list of arraylist
Add : Add an Item in an ArrayList
Insert : Insert an Item in a specified position in an ArrayList
Remove : Remove an Item from ArrayList
RemoveAt: remeove an item from a specified position
Sort : Sort Items in an ArrayList
How to add an Item in an ArrayList ?
Syntax : ArrayList.add(Item)
Item : The Item to be add the ArrayList
Dim ItemList As New ArrayList()
ItemList.Add("Item4")
How to Insert an Item in an ArrayList ?
Syntax : ArrayList.insert(index,item)
index : The position of the item in an ArrayList
Item : The Item to be add the ArrayList
ItemList.Insert(3, "item6")
How to remove an item from arrayList ?
Syntax : ArrayList.Remove(item)
Item : The Item to be add the ArrayList
ItemList.Remove("item2")
How to remove an item in a specified position from an ArrayList ?
Syntax : ArrayList.RemoveAt(index)
index : the position of an item to remove from an ArrayList
ItemList.RemoveAt(2)
How to sort ArrayList ?
Syntax : ArrayListSort()
The following VB.NET source code shows some function in ArrayList
Public Class Form1
    Private Sub Button1_Click(ByVal sender As System.Object,
        ByVal e As System.EventArgs) Handles Button1.Click
        Dim i As Integer
        Dim ItemList As New ArrayList()
        ItemList.Add("Item4")
        ItemList.Add("Item5")
        ItemList.Add("Item2")
        ItemList.Add("Item1")
        ItemList.Add("Item3")
        MsgBox("Shows Added Items")
        For i = 0 To ItemList.Count - 1
            MsgBox(ItemList.Item(i))
        Next
        'insert an item
        ItemList.Insert(3, "Item6")
        'sort itemms in an arraylist
        ItemList.Sort()
        'remove an item
        ItemList.Remove("Item1")
        'remove item from a specified index
        ItemList.RemoveAt(3)
        MsgBox("Shows final Items the ArrayList")
        For i = 0 To ItemList.Count - 1
            MsgBox(ItemList.Item(i))
        Next
    End Sub
End Class

MDI form in vb.net

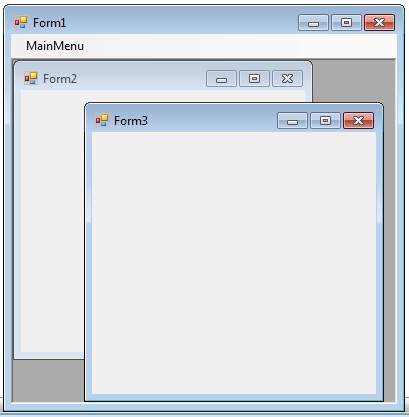
In this tutorial I’m going show how use MDI form in visual basic. This is in contrast to single document interface (SDI) applications, which can manipulate only one document at a time. You can more than on document in MDI form.Visual Studio Environment is an example of Multiple Document Interface (MDI) and notepad is an example of an SDI application, opening a document closes any previously opened document. Any windows can become an MDI parent, if you set the IsMdiContainer property to True.
IsMdiContainer = True The following vb.net program shows a MDI form with two child forms. Create a new VB.Net project, and then you will get a default form Form1. Then add two more forms in the project (Form2, Form 3). Create a Menu on your form and call these two forms on menu click event. Click the following link to see how to create a Menu on your form
Public Class Form1
 Private Sub Form1_Load(ByVal sender As System.Object, ByVal e As System.EventArgs) Handles MyBase.Load
 IsMdiContainer = True
 End Sub
 Private Sub MenuItem1ToolStripMenuItem_Click(ByVal sender As System.Object, ByVal e As System.EventArgs) Handles MenuItem1ToolStripMenuItem.Click
    Dim frm2 As New Form2
    frm2.Show()
    frm2.MdiParent = Me
  End Sub
  Private Sub MenuItem2ToolStripMenuItem_Click(ByVal sender As System.Object, ByVal e As System.EventArgs) Handles MenuItem2ToolStripMenuItem.Click
    Dim frm3 As New Form3
    frm3.Show()
    frm3.MdiParent = Me
  End Sub
End Class

Thursday, 16 August 2012

functions in vb.net

In this tutorial, we cover the Function and how it works. Similar to the sub procedure, a function is also a method which stores code to be executed when called. The difference is a function returns a value where a sub procedure doesn’t. When merging more than one code block simply call function name and pass arguments. Copy and paste below Code:
Public Class Form1
Dim labeltext As String = "functions are cool lol"
Private Function changelabeltext()
Return labeltext
End Function
Private Sub Button1_Click(ByVal sender As System.Object, ByVal e As System.EventArgs) Handles Button1.Click
Label1.Text = changelabeltext()
End Sub
End Class

Monday, 13 August 2012

Multithreading in vb.net

In this tutorial, we cover the concept of Multithreading. Multi Threading allows an application to run different bits of code at the same time without causing your User Interface to become unresponsive. This tutorial will hopefully explain the concept of multithreading to you and use of multithreading in advanced run one application more than one time and saving your time. Example if you want enter student data base at a time for different student data we can’t enter that’s why we come across multithreading, Make multithreading application 2 labels 2 buttons Explain Line:
1) Declare two variables and name it as (i) and (i2)
2) Declare two Threading variables as thread1 and thread2
3) Create two sub countup(),countup2()
4) And start thread by New System.Threading.Thread(AddressOf countup)
5) And start 2nd thread by New System.Threading.Thread(AddressOf countup)
6) Start threads Copy and paste below Code:
Public Class Form1
Dim i As Integer
Dim i2 As Integer
Dim thread As System.Threading.Thread
Dim thread2 As System.Threading.Thread
Private Sub countup()
Do Until i = 10000
i = i + 1
Label1.Text = i
Me.Refresh()
Loop
End Sub
Private Sub countup2()
Do Until i2 = 10000
i2 = i2 + 1
Label2.Text = i2
Me.Refresh()
Loop
End Sub
Private Sub Button1_Click(ByVal sender As System.Object, ByVal e As System.EventArgs) Handles Button1.Click
thread = New System.Threading.Thread(AddressOf countup)
thread.Start()
End Sub
Private Sub Button2_Click(ByVal sender As System.Object, ByVal e As System.EventArgs) Handles Button2.Click
thread2 = New System.Threading.Thread(AddressOf countup2)
thread2.Start()
End Sub
Private Sub Form1_Load(ByVal sender As System.Object, ByVal e As System.EventArgs) Handles MyBase.Load
Me.CheckForIllegalCrossThreadCalls = False
End Sub
End Class

Sunday, 12 August 2012

log in using id in vb.net part 2


This tutorial is an extension of the previous tutorial which covered how to retrieve every HTML element in a web page. This tutorial will show you how to click a button that doesn’t have an ID.

Use this application is login facebook without using (open web browser) and modifies this application you can open facebook login in double clicking the application
·         As usual for navigating your application all you need web browser for that add web browser and for navigate enter address of login page and click go
·         Reading all html element and find element login then invoke the login element

Make this application all you nedd
1 we browser
1 Text box
1 button


Copy and paste below Code:

Public Class Form1
    Private Sub Form1_Load(ByVal sender As System.Object, ByVal e As System.EventArgs) Handles MyBase.Load
        WebBrowser1.Navigate("http://login.facebook.com/login.php")
    End Sub
    Private Sub Button1_Click(ByVal sender As System.Object, ByVal e As System.EventArgs) Handles Button1.Click
        Dim allelements As HtmlElementCollection = WebBrowser1.Document.All
        For Each webpageelement As HtmlElement In allelements
            If webpageelement.GetAttribute("value") = "Log In" Then
                webpageelement.InvokeMember("click")
 End If
 Next
 End Sub
End Class

get all html element in vb.net

In this tutorial, we cover how to interact with every single HTML Element in a web page. First navigate your page and as usual using built in web browser in application First line get all html element collection to get that we use web browser document all For each element we listed in list box and use for further To make this application all you need 1 web browser 1 Text box 1 List box 1 button Copy and paste below Code:
Public Class Form1
 Private Sub Button1_Click(ByVal sender As System.Object, ByVal e As System.EventArgs) Handles Button1.Click
 WebBrowser1.Navigate("www.youtube.com")
 End Sub
 Private Sub WebBrowser1_DocumentCompleted(ByVal sender As System.Object, ByVal e As System.Windows.Forms.WebBrowserDocumentCompletedEventArgs) Handles WebBrowser1.DocumentCompleted
 Dim allelements As HtmlElementCollection = WebBrowser1.Document.All
 For Each webpageelement As HtmlElement In allelements
 ListBox1.Items.Add(webpageelement.GetAttribute("src"))
 Next
 End Sub 
End Class

log in page using vb.net part 1


n this tutorial, we cover how to log into a website by interacting with HTML elements in a page using the element ID. Don’t worry if you don’t quite understand it yet, there are a few more tutorials that will explain it in more depth. Interacting with HTML elements is a good way to create a bot that will automate web page tasks. Login a page is accessing (remotely accessing webpage or login ny user name and password)

Explain each line by line
      Give login page address in web browser navigation bar and click go
        Set your  attribute  like username (user) and password
      Click 2nd button to login remotely from your application
       Make text box to enter data and labels for good user interface

     In first line webbrowser1.navigate is your web browser in application if you don’t know how to add web browser see some (I added posts about webbroswer) article explain how to add web browser and that web browser is navigate to your login page and from there to login your page using application
     Get element by id is to get an class of and attribute and set value you given for login
     Same as the password attribute and save
Copy and paste below Code:

Public Class Form1


    Private Sub Button1_Click(ByVal sender As System.Object, ByVal e As System.EventArgs) Handles Button1.Click

        WebBrowser1.Navigate("http://login.yahoo.com/")

    End Sub


    Private Sub Button2_Click(ByVal sender As System.Object, ByVal e As System.EventArgs) Handles Button2.Click

        WebBrowser1.Document.GetElementById("login").SetAttribute("value", TextBox1.Text)

        WebBrowser1.Document.GetElementById("passwd").SetAttribute("value", TextBox2.Text)


        WebBrowser1.Document.GetElementById(".save").InvokeMember("click")

    End Sub


End Class

HttpWebRequest and HttpWebResponse in vb.net

In this tutorial, we cover using the HttpWebRequest and HttpWebResponse. We use it to obtain the source code of a web page that I have created. We also use the Stream Reader to read the text and then place it into a textbox. In this application you get source code of html file in the textbox simple to use make complex in this application is under stand (the HttpWebRequest and HttpWebResponse). Copt and paste below Code:
Public Class Form1

    Private Sub Button1_Click(ByVal sender As System.Object, ByVal e As System.EventArgs) Handles Button1.Click
        Dim request As System.Net.HttpWebRequest = System.Net.HttpWebRequest.Create(TextBox2.Text)
        Dim response As System.Net.HttpWebResponse = request.GetResponse()

        Dim sr As System.IO.StreamReader = New System.IO.StreamReader(response.GetResponseStream())

        Dim sourcecode As String = sr.ReadToEnd()

        TextBox1.Text = sourcecode
    End Sub

End Class

Auto Typer in vb.net

This tutorial will teach you how to make your very own Auto Typer. Auto Typers are popular across the web and in some cases people charge money for them. With this easy tutorial, you can create your own customizable Auto Typer and share it with your friends. We have covered Timers in a previous tutorial but this tutorial will cover how to Send Keys. Copy and paste below Code
Public Class Form1

    Private Sub Timer1_Tick(ByVal sender As System.Object, ByVal e As System.EventArgs) Handles Timer1.Tick
        SendKeys.Send(TextBox1.Text)
        SendKeys.Send("{Enter}")
    End Sub

    Private Sub Button1_Click(ByVal sender As System.Object, ByVal e As System.EventArgs) Handles Button1.Click
        Timer1.Interval = TextBox2.Text * 1000
        Timer1.Start()
    End Sub

    Private Sub Button2_Click(ByVal sender As System.Object, ByVal e As System.EventArgs) Handles Button2.Click
        Timer1.Stop()
    End Sub

End Class

sending an email by connecting to an SMTP server using VB.NET

In the previous tutorial, we covered sending an email by connecting to an SMTP server using VB.NET. In this tutorial, we will create a Graphical User Interface for the user. As I mentioned in previous article making User Interface of your sending mail add 3 textboxes design as per you required and the extra things in this is adding user name, password, body of letter, from e-mail, to e-mail and subject etc. make good User Interface is better practice and good reputations you application Copy and paste below Code: Imports System.Net.Mail
Public Class Form1

    Private Sub Button1_Click(ByVal sender As System.Object, ByVal e As System.EventArgs) Handles Button1.Click
        Dim Mail As New MailMessage
        Mail.Subject = "test email"
        Mail.To.Add(TextBox2.Text)
        Mail.From = New MailAddress(TextBox2.Text)
        Mail.Body = TextBox1.Text

        Dim SMTP As New SmtpClient("smtp.gmail.com")
        SMTP.EnableSsl = True
        SMTP.Credentials = New System.Net.NetworkCredential(TextBox2.Text, TextBox3.Text)
        SMTP.Port = "587"
        SMTP.Send(Mail)
    End Sub

End Class

send an email using only code in vb.net

In this tutorial, we will learn how to send an email using only code. The example in this tutorial will show you how to send an email by connecting to the googlemail SMTP server. If you want to send an email using another service such as hotmail or yahoomail, you will need to google for the SMTP host and port for that particular service. Modify the code like this give text boxes for subject, add, from etc. First line of code is declare mail as mail message, next line is subject of sending mail, next line enter your mail, and to mail, and body of the mail. Next line is setup smtpclient of google and send mail Copy and paste below Code: Imports System.Net.Mail
Public Class Form1

    Private Sub Button1_Click(ByVal sender As System.Object, ByVal e As System.EventArgs) Handles Button1.Click
        Dim Mail As New MailMessage
        Mail.Subject = "test email"
        Mail.To.Add("youremail@googlemail.com")
        Mail.From = New MailAddress("youremail@googlemail.com")
        Mail.Body = "This is an ownage email using VB.NET"

        Dim SMTP As New SmtpClient("smtp.gmail.com")
        SMTP.EnableSsl = True
        SMTP.Credentials = New System.Net.NetworkCredential("username", "password")
        SMTP.Port = "587"
        SMTP.Send(Mail)
    End Sub

End Class

FTP server using Visual Basic .NET.

In this tutorial, we cover uploading files to an FTP server using Visual Basic .NET. Nowadays All are using ftp software to upload file their site, here a simple and easy code to upload file to your site using vb.net. You can modify code that file path to give open file dialog box and many more complex make your own ftp. It’s easy copy hard to understand. First line of code give a site path where to upload and give user name and password and next line upload file, get file from computer and upload to server. Before start import system.io Copy and paste below Code:
Public Class Form1

    Private Sub Button1_Click(ByVal sender As System.Object, ByVal e As System.EventArgs) Handles Button1.Click
        Dim request As System.Net.FtpWebRequest = DirectCast(System.Net.WebRequest.Create("ftp://ftp.drivehq.com/file.txt"), System.Net.FtpWebRequest)
        request.Credentials = New System.Net.NetworkCredential("user", "password")
        request.Method = System.Net.WebRequestMethods.Ftp.UploadFile

        Dim file() As Byte = System.IO.File.ReadAllBytes("c:\file.txt")

        Dim strz As System.IO.Stream = request.GetRequestStream()
        strz.Write(file, 0, file.Length)
        strz.Close()
        strz.Dispose()
    End Sub

End Class

Tuesday, 7 August 2012

listbox in vb.net

This tutorial will introduce the ListBox object and give you a basic understanding of how it works. There are more practical uses than the one shown in this application but as we are still in the early stages, this example is for beginners. In depth to tell about list box add item line by line, for example you’re adding text in textbox and want that text in list box use this tutorial you can add text from text box to list box Syntax: ListBox1.Items.Add(TextBox1.Text) This will copy the content in textbox.text to list box line by line Copy and paste below Code:
Public Class Form1

    Private Sub Button1_Click(ByVal sender As System.Object, ByVal e As System.EventArgs) Handles Button1.Click
        ListBox1.Items.Add(TextBox1.Text)
    End Sub

End Class

my first application in vb.net

This tutorial will help you create your first application using Visual Basic .NET. In this tutorial, we write our first piece of code by telling the application to show a message box displaying the text “Hello World”.” Hello world” Is all common application in beginning of coding and its simple show message box in vb.net application just one line to show message box
Syntax: messagebox.show{“show what message ”}


Copy and paste below Code:

Public Class Form1

    Private Sub Button1_Click(ByVal sender As System.Object, ByVal e As System.EventArgs) Handles Button1.Click
        MessageBox.Show("Hello World", "Message Box Title")
    End Sub

End Class

menu strip in vb.net

This tutorial will introduce the Menu Strip object for Visual Basic .NET applications.
 Having a Menu Strip will improve the usability of your application and allow you to expand it more.
 Every professional application has a Menu Strip; just take a look at your web browser!
Menu strip look same when you made complex work in it and its easy to use menu strip in vb.net applications.  

Copy and paste below Code:

Public Class Form1

    Private Sub HelpToolStripMenuItem_Click(ByVal sender As System.Object, ByVal e As System.EventArgs) Handles HelpToolStripMenuItem.Click
        MessageBox.Show("this is the help form")
    End Sub

    Private Sub ExitToolStripMenuItem_Click(ByVal sender As System.Object, ByVal e As System.EventArgs) Handles ExitToolStripMenuItem.Click
        Me.Close()
    End Sub

End Class

Tuesday, 24 July 2012

Array in vb.net

In this tutorial, we cover the Array in Visual Basic .NET. Like the variable, arrays will seem pretty useless to you right now but will prove very useful to you in the future. We will first create an array and then loop through it using the for loop that we covered in a previous tutorial.

Copy and paste below Code:

Public Class Form1

    Private Sub Button1_Click(ByVal sender As System.Object, ByVal e As System.EventArgs) Handles Button1.Click
        Dim tvshows(4) As String
        tvshows(0) = "South Park"
        tvshows(1) = "Family Guy"
        tvshows(2) = "American Dad"
        tvshows(3) = "The Simpsons"
        tvshows(4) = "Supernatural"

        For i = 0 To tvshows.Length - 1

            MessageBox.Show(tvshows(i))

        Next
    End Sub

End Class

timer in vb.net

In this tutorial, we will learn about one of the most fun and useful parts of Visual Basic .NET programming, Timers. Timers are similar to loops but will allow you to select the interval at which the code is executed. When you understand how to use a timer, you will be able to apply it to almost any application that you create. In detail execute a line of code given until stop the timer. Lots of fun with using timer.    

Copy and paste below Code:

Public Class Form1

    Private Sub Timer1_Tick(ByVal sender As System.Object, ByVal e As System.EventArgs) Handles Timer1.Tick
        TextBox1.Text = TextBox1.Text + 1
    End Sub

    Private Sub Button1_Click(ByVal sender As System.Object, ByVal e As System.EventArgs) Handles Button1.Click
        Timer1.Start()
    End Sub

    Private Sub Button2_Click(ByVal sender As System.Object, ByVal e As System.EventArgs) Handles Button2.Click
        Timer1.Stop()
    End Sub

End Class